REJETTING 101
The first step is to identify the jets in the carb. The only way to properly identify jets is by measuring with a caliper or micrometer and they are inexpensive.
Do not buy jets until you have opened up your carb and verfied the jet size and type, thats a beginner mistake that ends in frustration. We do not take returns or exchanges on jets and jetting components due to people drilling them out, testing and tuning etc. We have this policy in place to protect all our customers from people who modify or damage the jets and then return them. This insures you get the best brand new jets, see things to check before ordering. Take your time and confirm jet dimensions before ordering. Have to open up the carb to rejet, might as well open it up and verify the jets.
Consider where to buy the jets
The next thing to consider before rejetting is where to buy the jets. Get jets from a place that is strict about the quality of their jets, and that does not take returns on jets. Returned jets are USED and potentially drilled out. Our goal is consistent jetting results. All our jets have been manufactured in the same plants since we opened almost 3 decades ago. Many manufacturers have their own numbering system, which means inconsistent jetting results. Many dealerships and stores buy the jets from the cheapest manufacturer, the numbers won't match and jet orifice vary from production lot to lot. You will also need to avoid cheap counterfeit jets on the market that won't match anyone else.
Is rejetting needed?
Typical changes that require rejetting are air filter and/or exhaust because they lean out the engine.. What symptoms indicate the engine is too lean?
a. Acceleration poor, surging.
b. Performance improves slightly as engine warms.
c. Better performance when choke/starter is used.
d. No color, overheated spark plug electrode (see reading plugs FAQ).
e. Removal of air cleaner makes condition worse.
f. Popping back thru carburetor. Popping on deceleration.
g. Engine pings or knocks, excessive engine heat.
h. Runs poorly at higher elevation in mountains.
If you are rejetting for a trip to a high altitude the engine will run rich in the mountains, then smaller number main and pilot/slow jets will be needed.
The carb bowl will be removed quite a few times during the rejetting process. Most carbs come from the factory with phillips head carb bowl screws. Most of the time these will strip out or so install some socket head screws. We carry Stainless Steel socket screws which won't strip out, or you can make a trip to the hardware store. The hardware store usually has black oxide screws but they rust very quickly and they may not have the correct length or threads. As the temperature changes season to season the jetting will need to be changed so screws that won't strip and some extra jets will be used later.
Some basic stuff to check
Many will look at jetting charts and infer from it the jet which is affecting carburetor circuit. For example at wide open throttle the engine runs poorly, according to a jetting chart the jet to adjust is the main jet. Since the pilot/slow jet is supplying fuel at wide open throttle we always recomend starting with the slow/pilot jet.
Rejetting should not be confusing if you keep it simple, do not change more than 1 thing at a time. For example don't change the pilot jet, move the needle clip and change the main jet, and most of all dont mix our jets with other jets that may be inferior clones. Stick with the same jet. If more than one item is changed no determination can be made as to which thing caused the result.
Always cover the basics before rejetting:
1) Air filter:Always make sure the air filter is clean before adjusting the jets.
2) Float height: Before changing any jetting parts always check the float height. When checking float height, the float should be resting, but not depressing the the spring loaded pin. This can be done by tilting the carb until it just makes contact with the pin. We have a variety of floats listed under the carb exploded drawings or via float list, the float may be listed in one or both places.
3) Spark plug: Always rejet with a fresh plug, the old plug will have color from how the engine ranbefore the rejetting process. A weak spark will make the engine run rich.
Should I buy a jet kit to do this?
You may or may not want to buy a kit to rejet, sometimes it makes sense, sometimes it does not. Read our faq on jet kits to help decide and point on some pitfalls of generic jet kits.
I'm new to rejetting, how do I know if the engine is lean or rich and what jets do I need?
If the bike seems to be lean then partially cover the intake to the air filter housing with duct tape, if the carburetor improves it is running lean.
If the bike seems to be rich remove the airbox cover, if the carburetor improves it is running rich.
Every bike is unique, different mods, intake, exhaust, elevation, temp etc. There is no way to accurately predict what jets to use. You can look in the jetting repository for what others have used, and we hope you will return the favor and email us your jetting results. We want to share this information to help everyone get their bike dialed in quickly and as inexpensively as possible (so please share results) jetting repository.
The Rejetting procedure
Do not deviate from the order listed below. The following instructions are for jetting an engine that has had performance parts added and is currently running lean. Also note that all these fuel adjustments overlap each other. Examples, modifying the slow jet also adds some fuel all across all rpm ranges, but mostly affects low end, the main jet affects the top end but also slightly effects the low end.
The rejetting sequence
The order which provides the best performance is to change:
1) idle
2) pilot screw
3) slow or pilot jet
4) main jet
5) the needle
6) accelerator pump (if equipped).
7) read the plug.
The process in detail share your results, we post them in the jetting repository to help others get a baseline to tune. More results provided = more everyone will benefit).
1) Idle screw: Let engine warm up. Move throttle slightly the response should be smooth. If not smooth then adjust idle about 15% higher than factory recommended stock setting.
2) Pilot screw or Air screw also sometimes called a mixture screw. Depending on carb this can adjust fuel or air. If it is a pilot screw this adjust the fuel mixture where screwing in leans and screwing out richens. If it is an air screw the opposite occurrs, screwing in richens and out leans. our guide will cover a pilot screw, if you have an air screw then tuning will be the reverse.
2A) Pilot screw: This adjust the fuel mixture where screwing it in leans screwing out richens. See photo below for typical location of screw. Turn screw in GENTLY until it bottoms. Turn out 1/4 turn at a time (wait 15 seconds between each 1/4 turn adjustment to give engine time to adjust) until highest RPM idle is obtained. Normally do not turn the pilot screw out more than 2.5 turns. If you must turn it out more than 2.5 turns go up to the next larger pilot jet. If you have an air screw it will be just the opposite. Screwing in richens and screwing out leans.
If the above adjustments did not get the engine running properly, the jets will need to be changed.
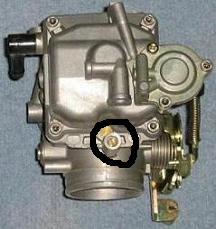
How do I get to the jets? Shown below is a typical carburetor. The jets are located in the bottom of the carb. Remove the 4 screws which attach the fuel bowl to the carburetor.
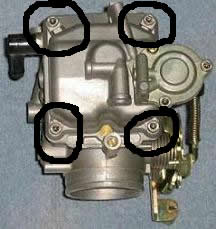
Once the 4 screws are removed the main jet and slow (or pilot) jet can be removed.
3) Pilot jet (Slow jet): If unable to obtain a smooth idle with pilot screw, increase the pilot/slow jet until a smooth idle can be obtained. A larger pilot/slow jet will eliminate or reduce popping that occurs when letting off wide open throttle. The pilot/slow jet will also improve cold weather starts. Go up 1 pilot/slow jet at a time, don't skip sizes. After installing a larger pilot/slow jet, re-adjust the pilot screw.
Now take it out and test ride at 1/4 throttle. If the pilot/slow jet is correct it will be easy to maintain a steady speed. Lean symptoms - if the bike surges, carb spits when throttle is opened, exhaust backfires or pops when throttle is closed, or the engine has trouble idling down, engine needs a larger pilot or slow jet to correct. If the engine idles rough, fouls plugs, or is hard to start, pilot is to big, or rich.
4) Main jet: Start with the biggest numbered main jet and run at wide open throttle, the engine should stumble at wide open throttle. Install the next smaller size until the stumble is gone. A general rule is to increase the main jet as long as each jet causes the engine to run as well as or better than the smaller jet in it before. When there is no longer any additional performance gain from the larger jets the jet size is too big - go back down one size.
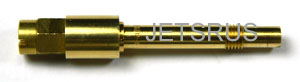
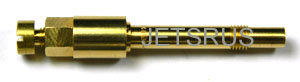
Note that the long piece below is not the main jet:
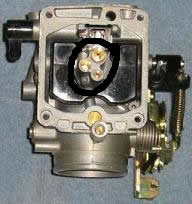
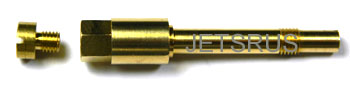
The main jet needs to be unscrewed as shown below:
Below the main jet is on the left:
Need help identifying your main jet? Go to Identify that jet.
5) Needle: Lift the needle to richen (move the clip towards the pointed end), lower the needle to lean the engine out (move the clip away from the pointed end). If needle is not adjustable try shimming it with a small washer JRU-8032 or others.
6) Accelerator pump (if equipped): If a rich stumble occurs when the throttle is opened, (delay the delivery of the accelerator pump fuel) widen the gap on the accelerator pump linkage to the lever, (to deliver fuel from the accelerator pump earlier) reduce the gap, FCR carb shown below.

7) Reading plugs :At this point it is best to do a plug check, go to FAQ-READING PLUGS.
What to do when the weather changes: The temperature, humidity, elevation etc all affect the jetting. Extra jets are always needed so the engine can be adjusted to meet changes in the climate. Hot weather will normally require smaller numbered jets and cooler weather will need larger numbered jets.
Some additional items to consider
The slow/pilot jet and main jet have numbers stamped on them, the next numerically larger number will richen the fuel mixture. Normally a handful of jets that are bigger are needed to get the engine dialed in. If the bike is used then the prior owner could have installed genuine or a generic jet. Do not mix jets, try to stick with our GENUINE or our OEM equivalents. Above all else DO NOT mix our jets with anyone elses. There are too many inaccurate copies available all over and their numbers wont match the correct number system.
How do I know if it is Genuine or genereic?
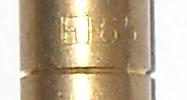
GENUINE MIKUNI jets will have a stamping on them which is a "square within a square" on them:
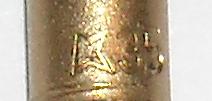
GENUINE KEIHIN jets will have a "K star" stamping on them:
What if the jet are generic? If the jets are generic the numbers usually do not match the GENUINE Mikuni or Keihin jet numbering system. We carry GENUINE KEIHIN, GENUINE MIKUNI and OEM EQUIVALENT JETS. All our jet numbers are the correct numbers. Do not mix our jets with aftermarket jets from a used parts bin or other manufacturers, doing so will waste time, result in poor jetting results and lead to frustration. Your engine may have been rejetted with someone elses generic jets which means more jet sizes may need to be purchased.